The easiest way to integrate ABCinvoice.eu with FileMaker is to use the ABCinvoice add-on.
Webinar of 10/14/2025: learn how to integrate the FileMaker add-on
Part 1 – Setting up the add-on
Notes on this documentation
- We assume you already have an invoices table (below “Invoices”), related to an invoice lines table (below “Lines”).
- If you manage multiple due dates in a separate table, that table is called “Due dates” below.
Installation
- Make sure your FileMaker Pro version is at least 21 (2024). You can always download the latest version here: for macOS, for Windows.
- Download the add-on. Place an order (it’s free) on the 1-more-thing website, then click the link you receive by email to install the add-on.
- Quit and relaunch FileMaker Pro.
- Duplicate your solution to keep a backup (you never know).
- In your solution, open an invoice layout (the form where you edit your invoices, not a print layout).
- Switch to Layout mode.
- Install the add-on (+ in the Add-ons tab of the left pane). Select the add-on you just downloaded (“ABCinvoice”).
- Still in Layout mode, drag the add-on onto the invoice layout.
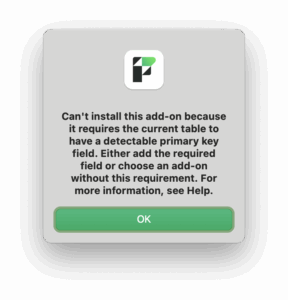
Known issue: with older files, when dragging the add-on, a message may say that no primary key can be detected.
Solution: temporarily add to your Invoices table a Text field defined with a serial number and a “unique” validation. Confirm and drag the add-on again. At the next step (relationships graph), replace the temporary field with your real primary key, then delete it.
Relationships graph
- Check in the relationships graph that relationships were created between your Invoices table and the
ABCinvoice_AttachmentandABCinvoice_LegalLiteraltables. If not, create them manually (from your Invoices table’s primary key toABCinvoice_Attachment::idInvoiceandABCinvoice_LegalLiteral::idInvoice). - Known issue: FileMaker automatically detects what looks like a primary key, but sometimes picks the wrong field! Make sure the right field is used in the relationships. Also, if the detected primary key of your Invoices table is a Number field, FileMaker changes the type of
ABCinvoice_Attachment::idInvoiceandABCinvoice_LegalLiteral::idInvoiceto Number. Please set them back to Text. - In the relationship options, disable creating related records from your Invoices table (you can keep deletion, which makes sense).
Field setup
- Copy all fields from the
ABCinvoice_invoiceExampletable into your Invoices table. - Recommended: change the storage options of container fields to external storage.
- Do the same for the container field of the
ABCinvoice_Attachmenttable: change the storage of thefilefield. - Copy the field from the
ABCinvoice_invoiceLineExampletable into your Lines table. - Due dates: if you manage multiple due dates, copy the field from the
ABCinvoice_InvoiceDueDateExampletable into your Due dates table. - Edit the
ABCinvoice_JSONrepresentation_{table}fields of the Invoices, Lines and Due dates tables (if applicable):- Dates must be passed as numbers to ensure compatibility across all systems (client/server). For example:
GetAsNumber ( Invoice::invoiceDate ) - Related data arrays must be passed like this:
; [ "invoiceLinesAttributes" ; JSONMakeArray ( List ( Lines::ΩABCinvoiceJSONrepresentation_invoiceLine ) ; ¶ ; JSONObject ) ; JSONArray ] - For the due date(s): if you don’t manage multiple due dates, use the
dueDateAsNumberparameter; if you manage them in a separate table, use the parameter shown in the example.
- Dates must be passed as numbers to ensure compatibility across all systems (client/server). For example:
- To identify the invoice recipient, a table of tax identification (TIN) codes is available here.
ABCinvoice_Config script
- Set the
$configvariable by specifying your Invoices table’s primary key and pointing to the fields you just added. - Specify a working layout (in the Go to Layout script step). This layout must be based on the table occurrence matching the fields defined in
$config. We recommend an empty layout, in Form view, without script triggers.
Settings
- Create an account on ABCinvoice.eu and get an API key.
- From the interface (the add-on installed on the layout), enter the API key and your country (the country invoices are issued from). Update the legal mentions library by clicking Update Legal Literals.
Clean-up
- Delete unused items that are only needed for the initial setup: tables containing the word Example and their table occurrences (
ABCinvoice_InvoiceExample,ABCinvoice_InvoiceLineExample,ABCinvoice_DueDateExample).
Legal mentions (Legal Literals)
From the settings, you just downloaded a library of legal mentions for your country, stored in the ABCinvoice_LegalLiteralLibrary table.
Legal mentions appear on invoices (at the bottom of the human-readable version).
From the Legal Literals popover, you can access and edit the library. For example, in some applications, some mentions may be irrelevant and can be deleted.
In Belgium, two sets of mentions are downloaded: in French and in Dutch. If you are in Wallonia, you can delete the Dutch mentions; in Flanders, the French ones. In Brussels, you can keep both.
Mentions can be marked as mandatory, for example the mention of early payment discount terms (even when there is no discount).
Others can be marked as default, which means they are automatically added to each invoice when the Legal Literals popover is opened.
Finally, some mentions contain the text {}, which can be replaced with a custom value.
To do so, you can either change the default text of the legal mention (for example, if you never grant discounts, simply replace the text with “No discount”), or change the auto-enter calculation of the ABCinvoice_LegalLiteral::text field, as explained in the comment of that calculation.
This lets you replace the {} tag with the information of your choice, based on the mention’s code.
Part 2 – Adapting your scripts
Attachments: all documents in the ABCinvoice_Attachment table are uploaded with your invoice.
Warning: once uploaded, an attachment cannot be deleted! You can however add more as long as the invoice has not been sent.
- Adding attachments: an ABCinvoice_sample_AddAttachment script is provided as an example, but keep in mind that you simply need to add documents related to your invoice in the ABCinvoice_Attachment table. For example, if your solution already stored invoice PDFs, just change your original script so it saves the PDF in this related table.
- Important: in this Attachment table, the isInvoice field indicates whether the attachment is the invoice itself (the invoice PDF). If so, set the field to 1 (True). If not – for example to add terms and conditions or a customer statement – set it to 0 (False). The add-on interface also lets you tick the matching checkbox.
- Several sample scripts are provided in the “ABCinvoice – integration example” folder, for example ABCinvoice_sample_CreateInvoice, which creates an e-invoice. These scripts show dialogs on errors; you will need to adapt them to your own error handling. Important: before adapting and using these scripts, we recommend duplicating this folder to make future add-on updates easier.
- Do not change the scripts in the “ABCinvoice (private)” folder.
- The add-on comes with value lists to help you. All of them are prefixed with ABCinvoice.
Part 3 – Receiving invoices
If you already have an incoming invoices table, duplicate and adapt these scripts:
- ABCinvoice_GetReceivedInvoices – Scheduled script
- ABCinvoice_GetReceivedInvoicesDetails
- ABCinvoice_Create_RINL (invoice)
- ABCinvoice_Create_RDUEDATES (invoice)
- ABCinvoice_Create_RTAX (invoice)
- ABCinvoice_Create_RECEIVED_ATTACHMENTS (invoice)
Layouts for the list of incoming invoices and their details are in the add-on’s ReceivedInvoicesLayouts folder.
The scripts that retrieve incoming invoices are also included and need no changes if you don’t have an incoming invoices table. To receive supplier invoices regularly, see Part 4 – Server scripts.
Part 4 – Server scripts
If your FileMaker file is hosted on FileMaker Server or FileMaker Cloud, open your server’s Admin Console and set up a schedule to run the following scripts:
- ABCinvoice_GetReceivedInvoices – Scheduled script, to regularly receive supplier invoices in your solution.
- ABCinvoice_GetInvoicesState – Scheduled script, which updates the invoice statuses.
A daily schedule is recommended.